

A Quick Look
Chicken stuffed shells deliver a delicious and satisfying meal that combines tender pasta shells, a creamy, flavorful filling, and a golden layer of melted cheese. This dish is perfect not only for cozy family dinners but also as an impressive centerpiece for gatherings.
One reason this recipe stands out is its versatility and ease of customization. For instance, you can use leftover chicken, shredded rotisserie chicken, or substitute the protein with vegetables to suit dietary needs. Additionally, it’s a fantastic make-ahead option that freezes beautifully, allowing for quick and hassle-free meals later.
Therefore, let’s dive into the ingredients and steps to create this delicious dish!
Table of Contents
Ingredients for Chicken Stuffed Shells
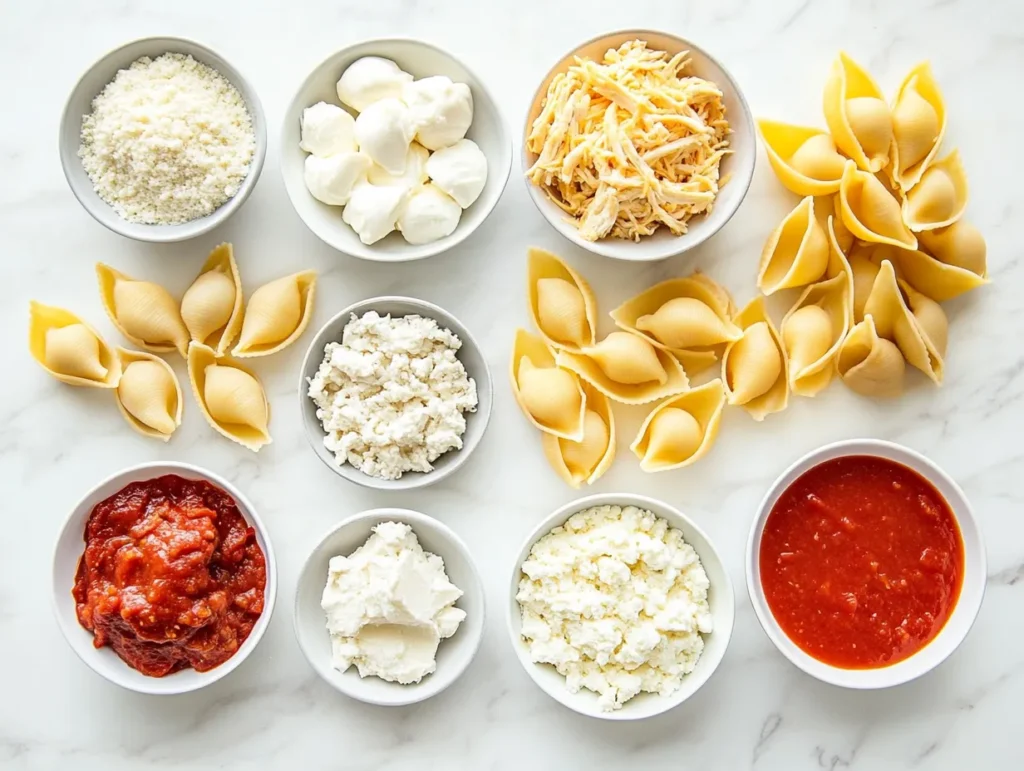
Essential Ingredients Needed
Pasta & Filling:
- Jumbo Pasta Shells – Large shells that perfectly hold the creamy chicken filling. Use 20-25 shells for a full dish.
- Chicken – 2 cups of cooked, shredded chicken. Rotisserie chicken works great for convenience.
- Cheese Blend – A rich, creamy mix of 1 cup ricotta, 1 cup shredded mozzarella, and ½ cup grated Parmesan.
Sauce & Binding:
- Marinara or Alfredo Sauce – 2 cups of your preferred sauce, or a mix of both for a balanced flavor.
- Egg – 1 large egg, beaten, to help bind the filling together.
Seasonings & Garnish:
- Garlic Powder – 1 teaspoon for a savory boost.
- Italian Seasoning – 1 teaspoon for a classic Italian herb blend.
- Salt & Black Pepper – ½ teaspoon salt, ¼ teaspoon black pepper to enhance flavors.
- Fresh Herbs – 2 tablespoons parsley or basil, chopped, for a fresh and vibrant garnish.
(Note: The full ingredient list, including measurements, is provided in the recipe card directly below.)
Preparing the Filling
Cooking and Shredding the Chicken
TThe chicken filling is the heart of this dish, so preparing it properly is key. If not using rotisserie chicken, try these methods:
- Boiling Method: Simmer chicken breasts in salted water for 15–20 minutes, then shred with two forks.
- Baking Method: Season with salt, pepper, and olive oil, bake at 375°F (190°C) for 25 minutes, then shred or dice.
For convenience, pre-cooked rotisserie chicken is a great time-saving option.
Combining Ingredients for the Filling
- Mix the Base: In a large mixing bowl, combine ricotta, shredded mozzarella, and grated Parmesan to create a rich, creamy texture.
- Add the Egg and Seasonings: Beat an egg and mix it into the cheese blend. Stir in garlic powder, Italian seasoning, salt, and black pepper until evenly incorporated.
- Incorporate the Chicken: Gently fold in the shredded chicken to ensure the filling is well mixed. If adding vegetables like spinach or broccoli, stir them in at this stage.
Tips for Flavor-Packed Filling
To ensure your filling is bursting with flavor:
- Use freshly grated Parmesan for a sharper, more pronounced taste.
- Add a pinch of nutmeg to enhance the creaminess of the cheese mixture.
- Taste the filling before adding the egg, and adjust the seasoning if necessary.
With your filling ready, you’re now prepared to move on to cooking the pasta shells.
Cooking the Pasta Shells
Choosing the Right Pasta Shells
For chicken stuffed shells, jumbo pasta shells are the best choice because they are large enough to hold a generous amount of filling. When shopping, look for “conchiglioni” on the package, which indicates the size you need.
Boiling and Cooling the Shells
Cooking the pasta correctly ensures that it holds the filling without falling apart. Follow these steps:
- Bring Water to a Boil: In a large pot, bring water to a rolling boil and add 1-2 teaspoons of salt. This step helps season the pasta.
- Cook Until Al Dente: Add the pasta shells and cook them for 1-2 minutes less than the package instructions suggest. For example, if the package says 12 minutes, cook them for about 10 minutes. They will finish cooking in the oven later.
- Drain and Rinse: Once the shells are cooked, drain them in a colander and rinse with cold water. This quickly cools them down and keeps them from sticking to each other.
How to Prevent Shells from Tearing
To keep your pasta shells intact:
- Stir gently as they boil to prevent them from sticking to the bottom of the pot.
- Use a large pot with plenty of water to give the shells room to move.
- Handle them carefully when draining and rinsing to avoid cracks or tears.
Once your shells are cooked and cooled, you’re ready to stuff them with the creamy chicken filling.
Assembling the Chicken Stuffed Shells
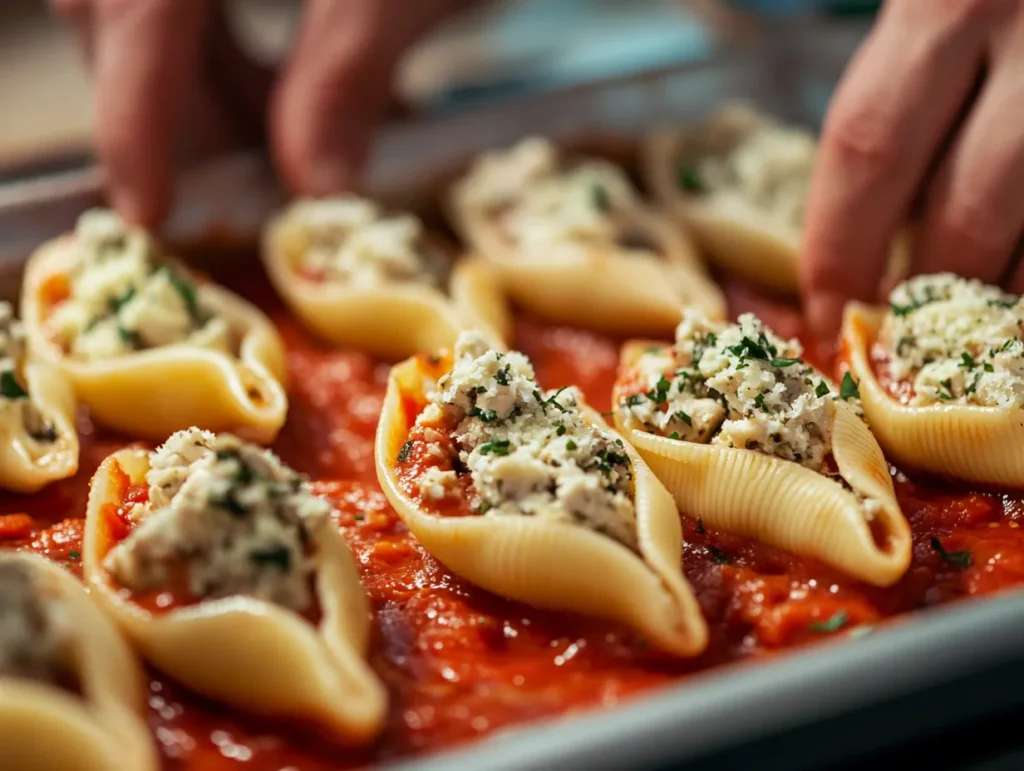
Stuffing the Shells with the Filling
Now that the filling and pasta shells are ready, it’s time to bring them together. Follow these steps for perfectly stuffed shells:
- Fill Each Shell: Using a small spoon, carefully scoop about 2 tablespoons of filling into each shell. Alternatively, you can use a piping bag to fill the shells quickly and neatly.
- Avoid Overfilling: Ensure the filling is level with the edges of the shell to prevent spillage during baking.
Arranging in the Baking Dish
Once the shells are filled, arrange them in your prepared baking dish:
- Spread Sauce: Pour 1 cup of marinara or Alfredo sauce evenly over the bottom of a 9×13-inch baking dish. This helps keep the shells from sticking while also enhancing the flavor.
- Place the Shells: Arrange the filled shells in a single layer, open side up. Nestle them close together, but not so tightly that they overlap.
Adding Sauce and Cheese
To enhance the flavor and ensure a creamy, cheesy result:
- Top with Sauce: Pour the remaining sauce evenly over the shells, ensuring each one is covered. This keeps them moist during baking.
- Sprinkle Cheese: Generously sprinkle 1 cup of shredded mozzarella over the top. For extra flavor, add a sprinkle of Parmesan as well.
With your shells assembled and ready, it’s time to bake them to perfection.
Baking Instructions
Temperature and Baking Time
Achieving melty, golden cheese and evenly heated shells requires the right baking method.
- Preheat the Oven: Set to 375°F (190°C) before baking for even cooking.
For the best results, always preheat your oven before baking stuffed shells. Learn more about why preheating your oven is crucial
- Cover the Dish: Wrap with aluminum foil to trap moisture and prevent over-browning.
- Bake: Place on the center rack for 25–30 minutes until the sauce bubbles and shells are heated through.
Serving and Storing Chicken Stuffed Shells
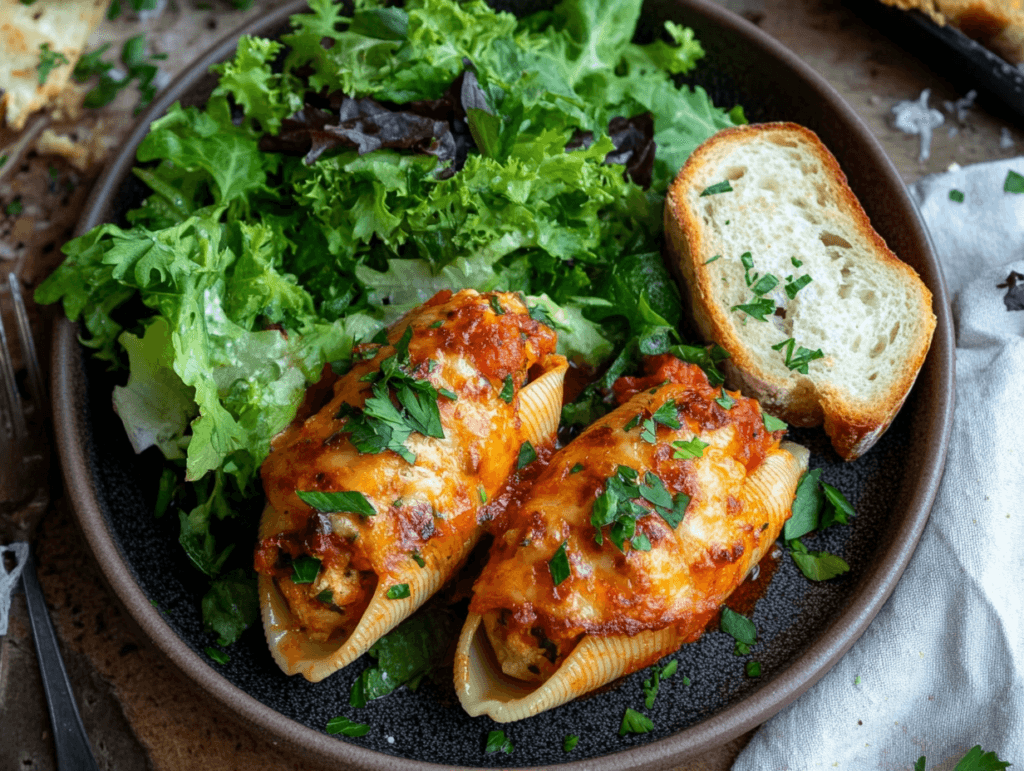
Best Ways to Serve Chicken Stuffed Shells
For the best flavor, serve chicken stuffed shells warm, straight from the oven.
Plating Tip: Arrange 2–3 shells per plate, drizzling extra sauce on top for a professional touch..
Garnish for Freshness: Sprinkle chopped parsley or basil for color and enhanced flavor.
Perfect Pairings: Serve with garlic bread, a fresh green salad, or roasted vegetables for a balanced meal.
Storing Leftovers
- Refrigerate: Store in an airtight container for up to 3 days. Freeze: Place in a freezer-safe container for up to 2 months.
Reheating Tips
When reheating stuffed shells, it’s essential to retain their flavor and texture. Follow these steps for the best results:
- From the Fridge: Bake at 350°F (175°C) for 20–25 minutes.
- From the Freezer: Bake at 375°F (190°C) for 40–50 minutes, removing foil for the last 10 minutes.
- Microwave Option: Reheat individual portions on medium power for 2–3 minutes.
Frequently Asked Questions (FAQs)
What goes well with stuffed shells?
Stuffed shells pair perfectly with garlic bread, salads, roasted vegetables, and soups for a complete meal. Garlic bread soaks up extra sauce, fresh salads add balance, roasted veggies bring texture, and tomato basil or minestrone soup offers a cozy pairing.
How do you keep stuffed shells from being runny?
To prevent your stuffed shells from becoming runny, follow these simple but effective tips:
- Drain Pasta Well: Remove excess water after cooking.
- Use a Thick Sauce: Simmer thin sauces to reduce moisture.
- Dry Ingredients: Pat dry veggies like spinach before adding them.
- Bake Covered First: Use foil to retain steam and prevent excess liquid.
What is the difference between stuffed shells and manicotti?
Although both dishes feature pasta stuffed with delicious fillings, the key differences lie in their shape and preparation:
- Stuffed Shells: Made with jumbo shell pasta filled individually; ridged texture holds sauce well.
- Manicotti: Uses smooth, tube-shaped pasta or crepes, rolled and baked for a different texture.
How long can you keep stuffed shells in the fridge before baking?
Unbaked stuffed shells last up to 2 days in the fridge. Cover tightly with plastic wrap or foil to prevent drying. Add cheese and bake fresh for the best flavor.
Can I use different types of chicken?
Yes! Try:
- Rotisserie Chicken – Quick and flavorful.
- Poached Chicken – Mild and tender.
- Grilled Chicken – Adds a smoky taste.
- Barbecue Chicken – A sweet, smoky twist.
What sauces pair well with stuffed shells?
While marinara sauce is the classic choice, there are several other options to try:
- Alfredo Sauce: For a creamy and indulgent twist.
- Pesto Sauce: Adds a fresh, herbal flavor that complements the chicken and cheese.
- Pink Sauce: A mix of marinara and Alfredo sauces offers a balanced, creamy tomato flavor.
How do I reheat stuffed shells without drying them out?
To reheat stuffed shells while keeping them moist:
- Add Sauce: Pour a little extra sauce over the shells before reheating to prevent dryness.
- Cover with Foil: Reheat in the oven at 350°F (175°C), covered with foil, to retain moisture.
- Microwave Carefully: For individual portions, microwave on medium power in 1-minute intervals, stirring gently if needed, until heated through.
Conclusion
Chicken stuffed shells combine creamy filling, tender pasta, and rich sauce for a comforting yet elegant meal. Perfect for family dinners or special occasions, this dish is versatile and customizable—choose marinara, Alfredo, or mix both!
It’s also freezer-friendly and easy to make ahead, making it ideal for busy days. With proper storage and reheating, you’ll enjoy delicious results every time.
Gather your ingredients and try this crowd-pleasing recipe—it’s sure to become a family favorite!
Print
Chicken Stuffed Shells Recipe – A Perfect Family Favorite
- Total Time: 50 minutes
- Yield: 4–6 servings 1x
Description
Chicken stuffed shells combine tender pasta, a creamy cheese and chicken filling, and a rich sauce, all baked to golden perfection. This dish is a comforting, crowd-pleasing meal that’s great for family dinners or gatherings. Plus, it’s freezer-friendly for easy meal prep!
Ingredients
- 20–25 jumbo pasta shells
- 2 cups cooked, shredded chicken (rotisserie or homemade)
- 1 cup ricotta cheese
- 1 cup shredded mozzarella cheese (plus extra for topping)
- ½ cup grated Parmesan cheese
- 1 large egg, beaten
- 2 cups marinara or Alfredo sauce (or a mix)
- 1 teaspoon garlic powder
- 1 teaspoon Italian seasoning
- ½ teaspoon salt
- ¼ teaspoon black pepper
- 2 tablespoons fresh parsley or basil, chopped (for garnish)
Instructions
Step 1: Prepare the Chicken
If not using rotisserie chicken, cook and shred 2 cups of chicken:
- Boiling Method: Boil chicken breasts for 15-20 minutes, cool, then shred.
- Baking Method: Bake at 375°F (190°C) for 25 minutes, cool, then shred.
Step 2: Make the Filling
- In a large bowl, mix ricotta, mozzarella, and Parmesan cheese.
- Stir in the beaten egg, garlic powder, Italian seasoning, salt, and black pepper.
- Fold in the shredded chicken (and any optional veggies).
Step 3: Cook the Pasta Shells
- Bring a large pot of salted water to a boil.
- Cook pasta shells 2 minutes less than the package instructions (they will cook further in the oven).
- Drain and rinse with cold water to prevent sticking.
Step 4: Assemble the Dish
- Preheat oven to 375°F (190°C).
- Spread 1 cup of sauce on the bottom of a 9×13-inch baking dish.
- Fill each shell with 2 tablespoons of the chicken mixture and place in the dish.
- Pour the remaining 1 cup of sauce over the shells.
- Sprinkle with extra mozzarella cheese.
Step 5: Bake
- Cover with foil and bake for 25-30 minutes, until the sauce is bubbly.
- Remove foil and bake for another 5 minutes to brown the cheese.
- Let rest for 5 minutes before serving.
Notes
Refrigeration
- Store in an airtight container for up to 3 days.
Freezing
- Freeze in a freezer-safe container for up to 2 months.
Reheating
- Oven: 350°F (175°C) for 20-25 minutes (or 40-50 minutes if frozen).
- Microwave: Heat on medium power in 1-minute intervals until warm.
- Prep Time: 20 minutes
- Cook Time: 30 minutes
- Category: Main Course
- Method: Baking
- Cuisine: Italian-American
Nutrition
- Calories: 450
- Sugar: 5g
- Sodium: 800mg
- Fat: 20g
- Saturated Fat: 10g
- Unsaturated Fat: 8g
- Trans Fat: 0g
- Carbohydrates: 40g
- Fiber: 3g
- Protein: 30g
- Cholesterol: 90mg
Keywords: Chicken stuffed shells, baked pasta, cheesy stuffed shells, easy family dinner, Italian comfort food, freezer-friendly meals, chicken pasta bake, creamy stuffed shells, pasta casserole
